
We’ve all been in a situation where we are watching a show on TV but couldn’t find the remote to increase or decrease its volume, so this project may help you find an easier and more fun solution. In this project, we’ll control the volume of a buzzer using hand gestures. The proposed methodology is implemented in Spyder using image processing libraries, OpenCV and Mediapipe.
Things used in this project:
Hardware Components:
| Bolt Wifi Module | X 1 |
| Buzzer | X 1 |
| Jumper Wires | X 2 |
Software and online services:
| Bolt Cloud |
| Bolt Cloud Android App |
| Spyder 5 |
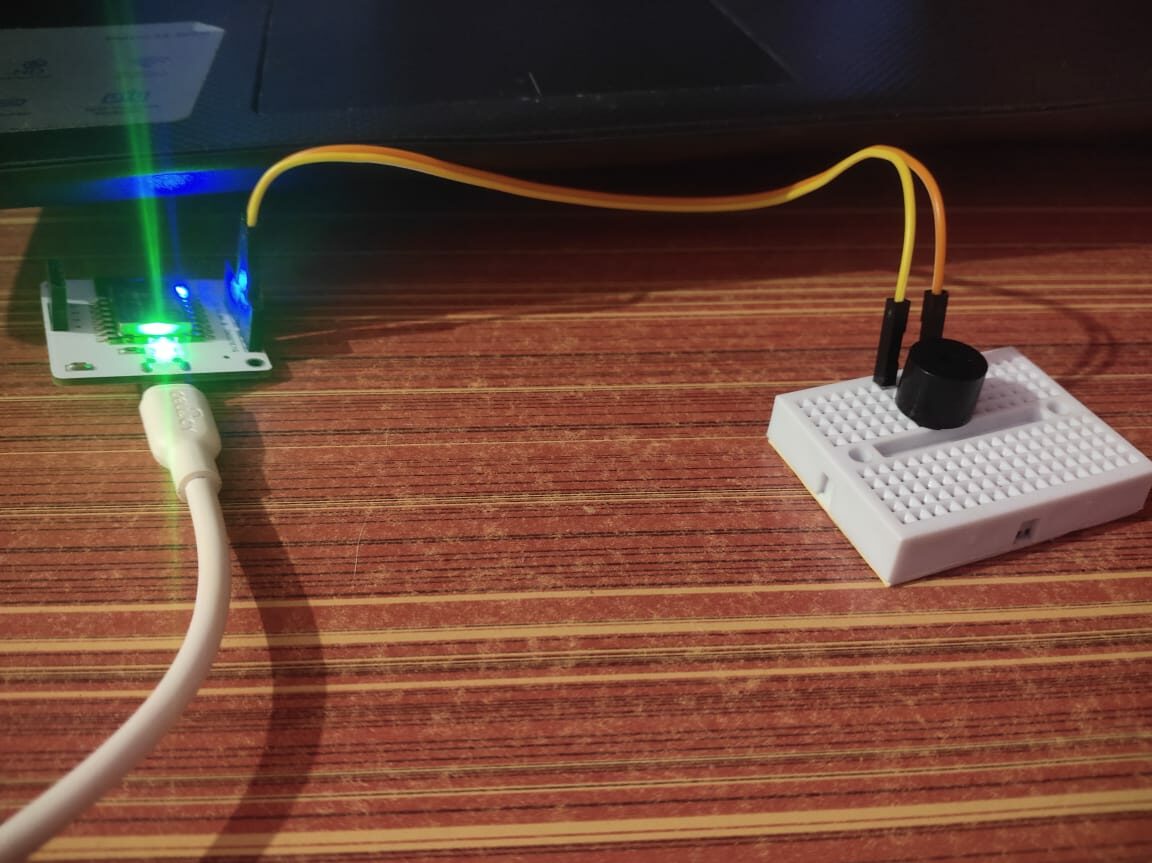
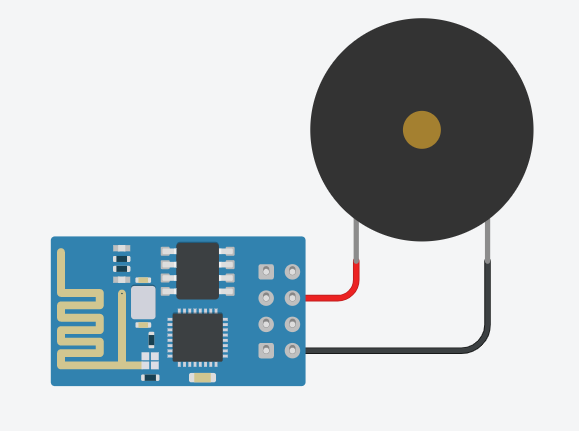
Hardware Setup:
Connect positive end of the buzzer to Bolt Wifi Module’s GPIO Pin 0 and negative end to Ground.
Note: The connections are made on a breadboard for more stability.
Software Programming:
Step 1: Getting Bolt Cloud API Credentials:
- Firstly, go to cloud.boltiot.com and create an account.
- After logging in, link your WiFi Module with the Bolt Cloud using Bolt IoT SetUp App which you can download on your mobile.
- After being linked, your cloud’s dashboard will display your device and you can now get your Device ID and API Key from the dashboard.
Step 2: Create a code for Hand Detection:
For hand detection, I’ve used two libraries, OpenCV and Mediapipe. In the first file, I’ve created a class that we’ll use in another file for volume control.
I’ve mentioned the link for the entire code below. For now, the given set of functions I’ve created in my class file is needed to firstly detect a hand and find its x, y coordinates in the frame.
def findHands(self, img, draw = True):
# firstly convert the image from bgr to rgb since the in built functions of mediapipe works on rgb format and the image we
capture is bgr
    imgRGB = cv2.cvtColor(img, cv2.COLOR_BGR2RGB)
    self.results = self.hands.process(imgRGB)
# Now we create a code for detection of more than one hand in the captured frame
# This code will detect a hand in the frame and would draw the outline of hand structure on it
    if self.results.multi_hand_landmarks:
    for handLms in self.results.multi_hand_landmarks:
    if draw:
        self.mpDraw.draw_landmarks(img, handLms, self.mpHands.HAND_CONNECTIONS)
    return img

# In mediapipe file they also have a function hand landmarks which gives x and y co-ordinates of 21 points marked on the hand
def findPosition(self, img, handNum=0, draw=True):
# x, y co-ordinates of 21 points are stored in a list
    lmList = []
# to detect more than one hand we use multi_hand_landmarks
    if self.results.multi_hand_landmarks:
        myHand = self.results.multi_hand_landmarks[handNum]
        for id, lm in enumerate(myHand.landmark):
            h, w, c = img.shape
# here cx, cy will give the exact co-ordinates of x, y hand co-ordinates with respect to the window size
            cx, cy = int(lm.x * w), int(lm.y * h)
            lmList.append([id, cx, cy])
    return lmList
Step 3: Linking the code with Bolt for Buzzer Volume Control:
In this file, we’ll link our hand detection model explained in the above code with the buzzer.
Firstly add your Bolt’s API Key and Device ID
BOLT_API_KEY = "XXXXXXXXX" #This is your Bolt cloud API
Key.
DEVICE_ID = "XXXXXXXXX" #This is the ID number of your
Bolt device.

mybolt = Bolt(conf.bolt_api_key, conf.device_id)
In the next part of the code, we’ll import the hand detector file we made earlier and then capture the live video from the webcam.
# detectionCon is a variable defined in the previous file which would set accuracy of hand detection; bydefault it is set to 0.5
detector = hd.handDetector(detectionCon = 0.7)
cap = cv2.VideoCapture(0)
Note: This is not the whole code, you can get the entire code file from the given link below:
https://github.com/Apurva0809/Buzzer-Volume-Control.git
# We would capture the live feed of web cam using a while loop
while True:
    ret, frame = cap.read()
    # detects a hand and its position and those positions are stored in a list
    detector.findHands(frame, draw = False)
    lmList = detector.findPosition(frame, draw = False)

    if len(lmList) != 0:
        # x and y co-ordinates of the tip of the thumb
        x1, y1 = lmList[4][1], lmList[4][2]
        # x and y co-ordinates of the tip of the index finger
        x2, y2 = lmList[8][1], lmList[8][2]
        # midpoints of distance between thumb and index finger
        cx, cy = ((x1+x2)//2), ((y1+y2)//2)

# Now the distance between the tip of the thumb and tip of the index finger in measured using hypot function
        length = math.hypot(x2 - x1, y2 - y1)
# My hand range is 20-180 and the buzzer's frequency range is 0-255, so to adjust the volume of the buzzer according to the length we use interp function.
# volumeBar gives a visual animation of increase and decrease in volume according to length
        volumeBar = np.interp(length, [20,150], [400, 150])
# volume adjusts the increase and decrease in volume of buzzer according to length
        volume = np.interp(length, [20, 150],  [0,255])

        cv2.rectangle(frame, (50, 150), (85, 400), (127, 255, 0), 3)
        cv2.rectangle(frame, (50, int(volumeBar)), (85, 400), (154, 250, 0), -1)

# when we press 'm' key on our keyboard the volume of the buzzer gets fixed according the length and the buzzer starts ringing
        if mode == True:
# link the frequency obtained using the above functions with buzzer via Bolt's wifi module
            mybolt.analogWrite('0', int(volume))
            mode = False

    cv2.imshow("Frame", frame)
    k = cv2.waitKey(1) & 0xFF
    if k == ord('m'):
        mode = not mode
# press 'esp' key to exit the code
    elif k == 27:
        break
# The buzzer would keep ringing at different frequencies which we set at different lengths until we exit the code
mybolt.digitalWrite('0','LOW')
cap.release()
cv2.destroyAllWindows()
Below is a video demonstration:
Conclusion:
This project provides us with a link between computer vision and IoT. This proves that we can link IoT with anything and everything which would help us to make our daily chores simpler.