Automatic Curtain using Bolt IoT Module
This project is all about adding Luxury to life using bolt IoT module. In this project I am going to build automatic window curtain that will open up automatically giving you some sunshine every morning.
Things used in this project
Hardware components -
- Bolt WiFi module
- Steel rod
- Arduino uno
- L298n stepper motor controller
- Stepper motor mounting brackets
- Stepper motor
- 12v dc supply
- 5v dc supply (power bank)
- Curtain cloth
- Jumper wires
Software components -
- Bolt Cloud
- Bolt IoT Setup app
- Integromat Software (www.integromat.com)
Hardware Setup
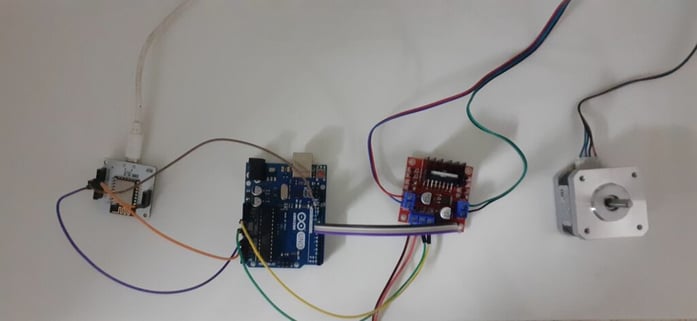
First lets get stepper motor working
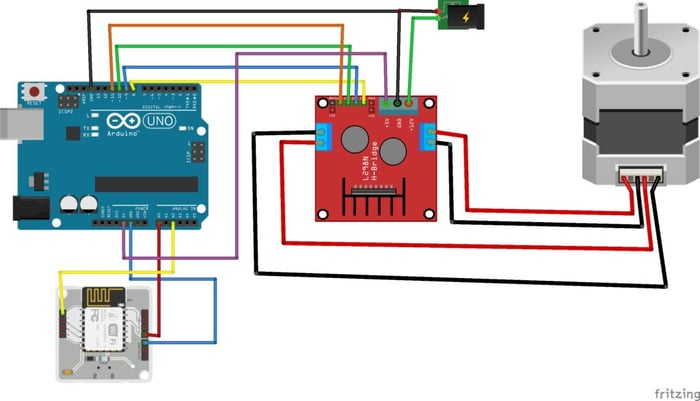
- Connect the A+, A-, B+ and B- wires from the stepper motor to the module out1, out2, out3 and out4 respectively.
- Here we have provided l298n controller with external 12v and 5v power supply so remove the onboard voltage regulator jumper.
- Connect stepper motor driver module to Arduino using 4 jumper wires.
- Connect wires from IN1,IN2,IN3,IN4 from driver module to pins 8,9,10,11 on Arduino respectively.
- Connect external 12v to the driver module and 5v from Arduino as shown
Now lets make curtain
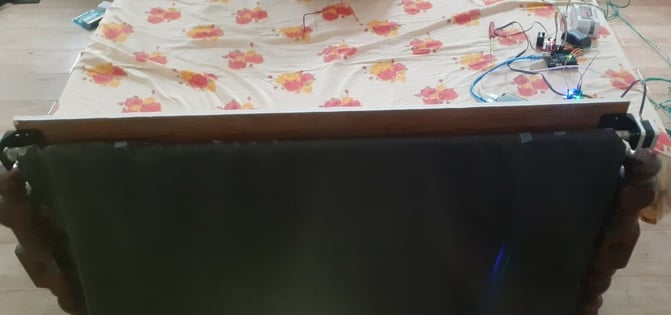
- Clamp the clamp to a surface leaving the space for the rod in between.
- Suspend one end of the rod on clamp and other end of the rod to stepper motor connected to the clamp.
- Fix the curtain cloth on the rod (I fixed it using quickfix adhesive).
Caution: Please ask your parents permission to drill window frame for fixing clamp. It is likely that they deny permission for your crazy idea, my case was same so I drilled and fixed the clamp on my bed’s headboard.
It might look something like this:
Arduino coding
Upload the code below to Arduino
#include <Stepper.h>
// Created by Aashik Pradeep on 20/1/2021

int sensorPin = A0;
// select the input pin for the potentiometer
int sensorP = A2;
int sensorValue = 0;
int sensorLValue=0;
const int stepsPerRevolution = 200;
// change this to fit the number of steps per revolution
Stepper myStepper(stepsPerRevolution, 8, 9, 10, 11);

void setup() {

  // set the speed at 60 rpm:
  myStepper.setSpeed(85);
  // initialize the serial port:
  Serial.begin(9600);
}

void loop() {
  sensorValue = analogRead(sensorPin);
     sensorLValue = analogRead(sensorP);


   if(sensorValue>50&&sensorLValue<5){
  Serial.println("clockwise");
  myStepper.step(200); }

  if( sensorLValue>50&&sensorValue<5){
  // step one revolution in the other direction:
  Serial.println("counterclockwise");
  myStepper.step(-200);
  }
 }
Here I have used analog pins instead of digital pins to avoid pullup resistors and its sensitivity issues.
When the Bolt module’s digital pin gives output the analog pin in arduino will read a value between 50 and 5.
When the pin gets input the stepper takes 200 steps clockwise or anticlockwise accordingly.
Connecting Bolt to Arduino
Connect A0 AND A2 pins to digital pins 1 and 2 of Bolt module respectively also short the ground of Bolt and Arduino as shown in circuit diagram above
Software Programming
Step 1: Software coding on Bolt
Create a product on bolt cloud initializing two digital pins of Bolt module.
Here I have used digital pin 0 and digital pin 1, connect them using jumper wires. I have used html language to write the code so that it is simple and all can understand, but if you are a pro go for JavaScript interesting button layouts are readily available in Docs section in Bolt cloud ( https://docs.boltiot.com/controlling-devices ).
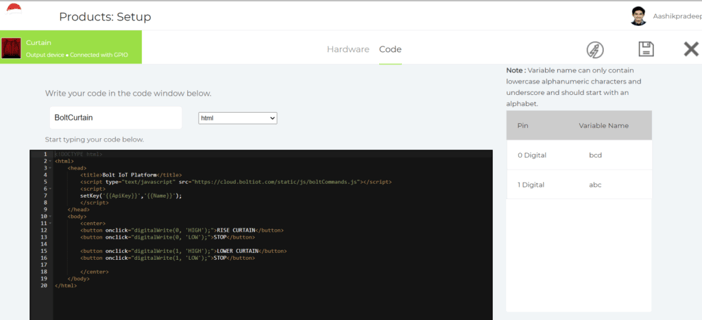
<html>
    <head>
        <title>Bolt IoT Platform</title>
        <script type="text/javascript"
  src="https://cloud.boltiot.com/static/js/boltCommands.js">
      </script>
        <script>
        setKey('','');
        </script>
    </head>
    <body>
        <center>
        <button onclick="digitalWrite(0, 'HIGH');">
         RISE CURTAIN
        </button>
        <button onclick="digitalWrite(0, 'LOW');">
         STOP
        </button>

        <button onclick="digitalWrite(1, 'HIGH');">
          LOWER CURTAIN
        </button>
        <button onclick="digitalWrite(1, 'LOW');">
         STOP
        </button>
        </center>
    </body>
</html>
Link the product to the Bolt device
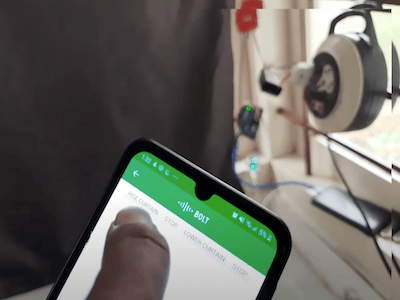
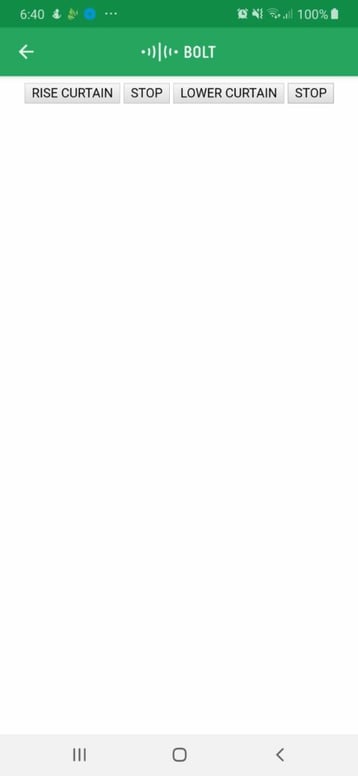
By now its all set to run, now use 5v power source (power bank) to power Bolt module and Arduino and stepper motor drive.
Switch on the 12v power supply to the stepper motor drive. Open bolt app on phone and you will find “RISE CURTAIN” button to rise the curtain & “LOWER CURTAIN”to lower the curtain and stop button to stop rising or lowering of the curtain at desired position.
The good news is seeing this mom allowed me to fix it on window. If you are doing so please make sure there is a power supply near window so u can power 12v external power source for stepper motor.
Making automatic curtain smart
Using integromat you can make your curtain smarter. This will enable the curtain to operate at particular time in a day without your interference.
Here I have used integromat to open the curtain automatically at 6:00am every day and shut it at 7:00pm every day.
Step 2: Linking integromat
- Create account on integromat
- Create New Scenario using Button which is located on the Top Right Corner of your page.
- Type Bolt IOT in the Search Box or You can Scroll Down and find the Bolt IOT Icon.
- Click on? Icon and Click on Bolt IOT. The Module will ask for Connection and Command. Click on Add Connection, it will ask for API key and Connection Name.
- Type in device name and api key which are available on your bolt cloud.
- Now Select the Command Box. It Drops down into a List. In the GPIO List, Select Write Digital Output.
- The Name of the Device must be Entered in the Device name Box. In the Pin Box Type 0 and in the State Box Type “High”. Then Select Continue.
- Then Select Tools Icon.
- Select Sleep Option and Link it with the Bolt Module. Set Delay as per time required for your curtain to rise up completely.
- Then Add Another Bolt Module next to the Tools Icon, Select the Same Connection and Same Command as mentioned above.
- Once Again type the Device Name, Pin No. (0) and in the state Box, Type “LOW”.
- Now click on a clock icon on first bolt module, then set the required time which is the time of the day you want your curtain to rise, and if you want it to happen every day select everyday on run scenario.
Now you have automated rising of curtain ,for automating lowering of curtain do the same steps except of pin 0 use pin 1.

The Video Demonstration
Watch our project in action:
Conclusion
Getting up in the morning with sunshine already in your room is likely to make you happy and energetic. Also enjoy the ease of lowering and rising the curtain at your comfort place without getting up. Hope this Bolt Iot project brings some sunshine to you and your room.
Want to build more such IoT and ML projects? Want to learn IoT and ML from basics?
Check out the Bolt IoT and ML training. This online video training is excellent for those who want to start with IoT and ML because it teaches you to build projects from the basics. Click on the button below to know more about the training.
