
Nowadays people find it cumbersome to manually record attendance and the live presence of people in a room. It is essential to maintain a record of peoples’ activity in an important room/office.In the era of software I attempted to find a solution. So I developed a complete security system that records when someone unlocks the door. It works in real time, using IoT . It stores the data and makes it accessible across the globe at any instant.
Excited? Let's get started.
Things used in this project
Hardware components -
- Bolt-IoT wifi module
- Arduino uno (almost any Arduino board will do)
- 9v power source (for the Arduino, dc motor and driver)
- IR sensor
- Buzzer
- DC geared motor
- RFID reader with tag
Software components -
- Bolt Cloud
- Bolt Cloud API
- python3, with pip packages present in requirements.txt
- MongoDB server / atlas
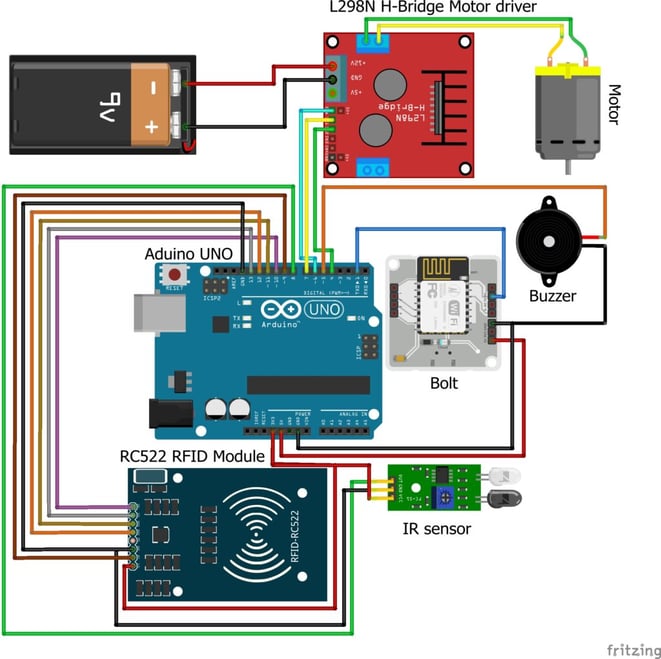
Hardware Setup
Step 1: Circuit and power source
Make the circuit connections according to the following image.
Don’t connect the Tx pin now.(fritzing file link available in README.md).The 9v battery can be replaced by any 9v power source.
The Arduino board can be powered by connecting 9v to the dc jack/ Vin pin.(double check the polarity). the bolt iot module can be powered through a micro usb cable. or a 5v output from the Arduino
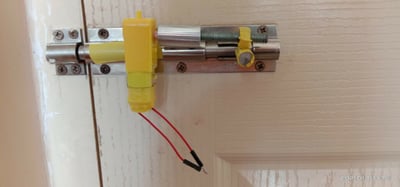
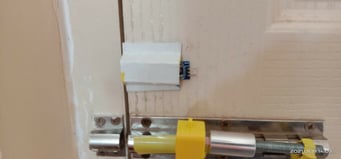
Step 2 :Fixture on the door
The dc geared motor can be fixed onto the lock of the door like this

Then the IR sensor should be attached on the edge of the door
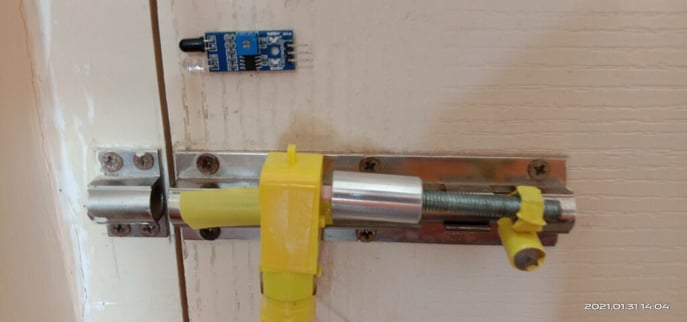
The IR module can be powered and the onboard pot should be adjusted till detect the wall. It can also be covered to avoid interference

Software Programming
Step 1:Setup Bolt
Connect your Bolt-IoT module to a WiFi access point and link it with your Cloud account with the bolt app. more info here.
If there are any products linked with the device, unlink it.
Copy your API key and device ID.
Step 2: Setup Environment
Software Installation
Install python3 and pip3 (more info)
#!/bin/bash
$ python3 --version
# if lesser than 3.7, run the below commands
$ sudo apt update
$ sudo apt install python3.7
$ sudo apt install python3-pip
If you want to run the MongoDB server locally, install it from here.
You can also run it on MongoDB atlas . more info on using MongoDB atlas.MongoDB compass can be used to easily manage the data.
Virtual Environment , Git ,Pip packages and Env vars
Create a python virtual environment and clone my git repository by running the below commands in the terminal
$ python3 -m venv venv
$ source venv/bin/activate
$ git clone https://github.com/Adith625/SmartSecuritySystem
$ pip install -r requirements.txt
Rename .env.example to .env and open it a text editor.
Enter your Bolt cloud API key and Device id
If you are using mongodb atlas, enter the cluster’s connection string. the <dbname> can be removed.The secret string can be left as default or can be generated by running the below commands in the console
>>> import secrets
>>> secrets.token_urlsafe(16)
'Drmhze6EPcv0fN_81Bj-nA'
Step 3: Upload the firmware to Arduino
Open the reset password sketch in the arduino ide.
Disconnect the Tx wire from the arduino during uploading.
Select board type and com port.Upload the sketch, open the Serial monitor and scan all 4 tags.Replace the uid variable in the Arduino_code sketch with the values displayed on the serial monitor. Upload this sketch, power on the bolt, wait till it connects with the cloud and connect the tx pin to bolt.
Step 4: Run the program! (locally)
Run the program main.py . This program requests and receives the data from the Bolt cloud API service and stores the data in the database with the timestamps. This updates and fills the database with the data. To view the data, run the flask application.
$ python main.py
$ gunicorn app:app
Step 5: or Run it on Heroku
To run it on heroku, you must have an atlas account.
create a heroku account, download the CLI and login. Create a Procfile in the root directory of the project and enter the following in it.
web: gunicorn app:app
worker: python3 app.py
create a file named runtime.txt and add enter
python-3.8.7Stage and commit the changes. push it to heroku by running the following.
$ git add Procfile
$ git add runtime.txt
$ git commit -m "Heroku"
$ heroku create
$ heroku config:set MongoDB=<your atlas connection string>
$ heroku config:set debug=false
$ heroku config:set Secret_Key=<Secret key>
$ heroku config:set Bolt_Api=<api key>
$ heroku config:set Device_Id=<device id>
$ git push heroku main
$ heroku open
$ heroku logs -t
The Video Demonstration
Watch our project in action:
Application
It can be used in administrator room,head offices etc., It has a record of the presence and duration of each person. It is useful in
industries, educational institutions, server rooms, offices, meeting rooms, factory etc., since it can easily be setup ,thanks to the fast connection time of the boltiot module.
Features
- The data is safely transferred through bolt iot API service
- The python program stores the data in a database which is organised on the value of year and month.
- Data of any day can be requested from the web page
- Since the data is being displayed on a web page, all programs can be hosted on the cloud (including the DB)and can be accessed from anywhere in the world
- user authentication through RFID tag with matching UID and secret randomly generated password.(more security features can be implemented)
- 16 byte randomly generated secure password
- can be fully battery powered
- portable and easy to setup.
- data transferred wirelessly through bolt API
- data stored in Database
- very user friendly, attractive, user interface chart that displays data in a graphical way
- user activity of any specific day can be accessed
Ideas and plans for future development
- more customisation and configuration in webapp. eg., user profile, theme, header style, name alias
- stores password of RFID in database
- add more buzzer tones from arduino
- add LCD panel to arduino
- remotely unlock the door for guests.
- alert notification if anyone enters outside set hours
- and many more ideas…
The Video Demonstration
Watch our project in action:
Conclusion
This is a complete system that detects, stores and displays the activity of the users in a room. When anyone wants to unlock a door, they must scan a RFID tag. The tag is verified and the signal that a particular user has entered is sent to the cloud. A Python program then receives the information that a user has unlocked the door and stores this data in a database. Then a Python progam serving a flask app reads the database and displays the data in a graphical way in the form of a timeline chart.
Want to build more such IoT and ML projects? Want to learn IoT and ML from basics?
Check out the Bolt IoT and ML training. This online video training is excellent for those who want to start with IoT and ML because it teaches you to build projects from the basics. Click on the button below to know more about the training.