Smart Garden with IoT Plant Monitoring System

Overview
In today's busy world, we forget to nourish and water plants that make our home clean and soothing. Think about it -- what if your plants are able to tell you when they are happy and when they require proper attention? It would be awesome, right!
This project monitors soil moisture and sunlight intensity at regular intervals. The data is processed through Integromat logic, which sends SMS notifications about your plant's health status. The system aims to simplify plant care through automated monitoring.
Hardware Components
| Component | Quantity |
|---|---|
| Bolt WiFi Module | 1 |
| LDR (Light Dependent Resistor) | 1 |
| Resistor 10k Ohm | 2 |
| Soil Moisture Sensor | 1 |
| Male/Male Jumper Wires | As needed |
| Mobile Charger | 1 |
| Female Header 8 Position 1 Row (0.1") | 2 |
Software & Online Services
- Integromat
- Twilio SMS Messaging API
- Bolt Cloud
Hardware Setup
Step 1: Gathering Components
Gather all the components listed above. They are easily available in the market at a reasonable price.
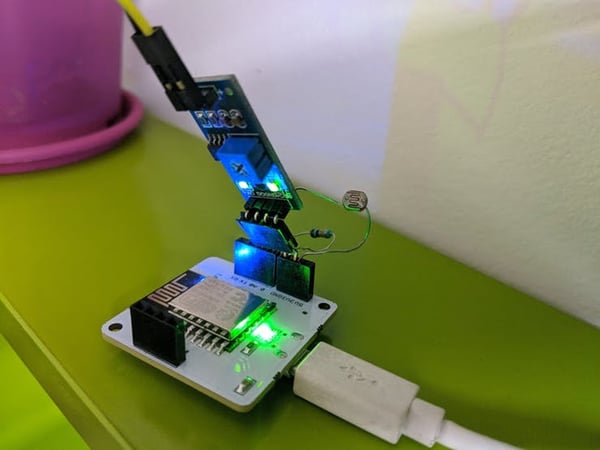
Step 2: Assembling the Hardware
- Gather all required components
- Connect one end of the LDR to pin A0 and the other to the 3.3V supply of the Bolt
- Connect a 10k Ohm resistor between A0 and GND pins of the Bolt
- Connect the soil sensor probe to its amplifier circuit using female/female jumper wires, and connect the VCC, GND and DO (Digital Output) pins of the amplifier circuit to 3.3V, GND and pin 0 of the Bolt unit respectively
- Place the soil sensor probe into the plant and power up the Bolt
Important: Check all the connections before powering up the Bolt and refer to the schematic for any help.
Note on Voltage: The A0 pin of the Bolt has an input range of 0-1V. Hence we use 3.3V instead of 5V to power up the device.

Software Programming
Step 1: Platform Details
Bolt IoT Platform: Bolt IoT platform gives you the capability to control your devices and collect data from IoT devices safely and securely no matter where you are. Get actionable insights by deploying machine learning algorithms with just a few clicks to detect anomalies as well as predict sensor values.
Integromat: The role of Integromat is to seamlessly connect your apps/services, so you can concentrate on new tasks rather than repeating the same tasks again and again.
Twilio: Twilio is a cloud communications platform as a service company. Twilio allows software developers to programmatically make and receive phone calls and send and receive text messages using its web service APIs.
Step 2: Connecting Bolt to Cloud
After assembling the hardware, register and connect the Bolt unit to the Bolt Cloud.
Step 3: Building Logic on Integromat
- Create an account at integromat.com
- Create a new scenario using the "Create a new scenario" button in the dashboard
- Choose BoltIoT and Twilio services
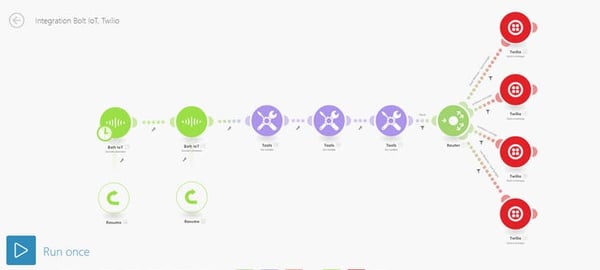
- Build the required logic flow as shown in the diagram below
Enter credentials for the services:
- Bolt device ID and API key (from cloud.boltiot.com)
- Twilio SSID, authentication token, and sender's number (from twilio.com)
Time Configuration (Variable Setup)
Use the following commands to set time limits:
Current time command:
{formatDate(now; "HH.mm"; "Asia/Kolkata")}Upper time limit (e.g., 17:00):
{formatDate(addHours("2016-12-08T06:00:00"; 11); "HH.mm"; "Asia/Kolkata")}Lower time limit (e.g., 6:00):
{formatDate(addHours("2016-12-08T00:00:00"; 6); "HH.mm"; "Asia/Kolkata")}Error Handling
Attach a resume error handler to both BoltIoT services in order to prevent Integromat from stopping the scenario automatically in case of any error. In the handler, use any number that is to be assigned to the Bolt in case of error (e.g., 12345).
Filtering
Apply a time barrier and error filter to the router's input branch, and moisture content and light intensity filters to each of the router's output branches.
Step 4: Working Principle
The soil sensor measures the moisture content present in the soil and the LDR measures the light intensity falling on the plant. Both data readings are read by the Bolt unit and sent to Integromat logic whenever a read request arrives.
In the case of the soil sensor, if the moisture content is less than the threshold value (set by the user), the output of the sensor is LOW; otherwise it is HIGH. This digital data is read from pin 0 of the Bolt. In the case of the LDR, analog data is read from the A0 pin of the Bolt.
The process flow works as follows:
- BoltIoT App sends digital and analog read requests to the Bolt
- Three set variable tools get current time and set the operation time window
- The router sends different SMS messages based on received data
- Each branch has a filter with specific conditions
- The resume error handler manages errors by assigning specific user IDs
- The system checks if it is daytime and verifies for errors
- If conditions are satisfied, an SMS alert is sent about plant health
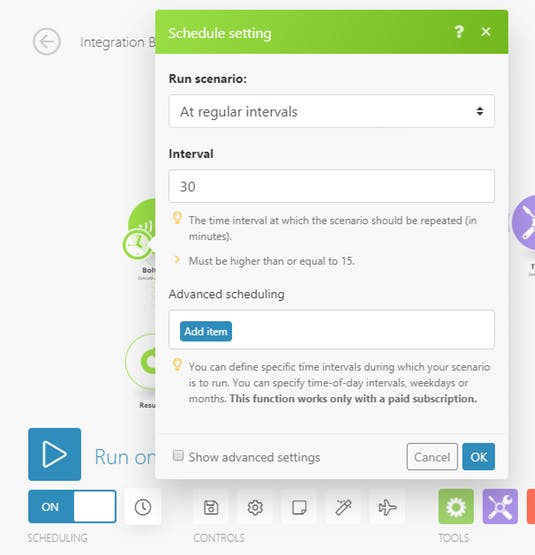
Step 5: Schedule and Save
Schedule your scenario according to your requirements and save it. In this case, the scenario will run every 30 minutes.
Important: Please don't forget to save your work before closing it.
Conclusion
With the above simple steps, you can monitor the sunlight and water content of your plants and get alerts when you need to act. The system automates plant health monitoring so you never forget to water or provide adequate sunlight to your plants.