Google Assistant + IFTTT + Bolt IoT Platform to make your own voice-controlled lighting system.
Ever since I have got Google Assistant working on my phone, I have wanted to control my house appliances with it. I have spent quite some time trying to figure this out, but when I saw PPV's project on interfacing Amazon Alexa, something just clicked.
This blog is kind of a replica of the earlier blog, the only difference being that I have used Google Assistant in the place of Amazon Alexa. This gives me the freedom to control home appliances from anywhere in the world, using my voice. The only things that I need is my phone and a good internet connection.
Things used in this project
Hardware components
Software apps and online services
Hardware Setup
Step 1) Setup the Bolt WiFi module to connect to your Bolt Cloud account. You can check the documentation given here to find out how.
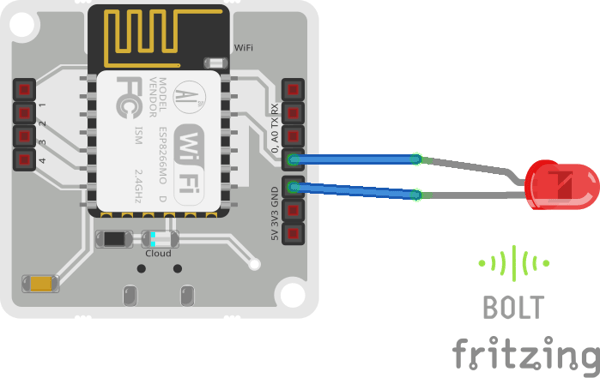
Step 2) Plug the longer end of the LED in the Pin 0 of Bolt WiFi module shorter end to the ground pin (GND), and power on the Bolt WiFi module. You can see the connections in the circuit diagram below.
Software Programming
Step 1) Get the Bolt API Key and Device ID
Login to cloud.boltiot.com and note the ID of your Bolt WiFi Module.
Now click on the API Tab and under the section for Generate Key, click on Enable.
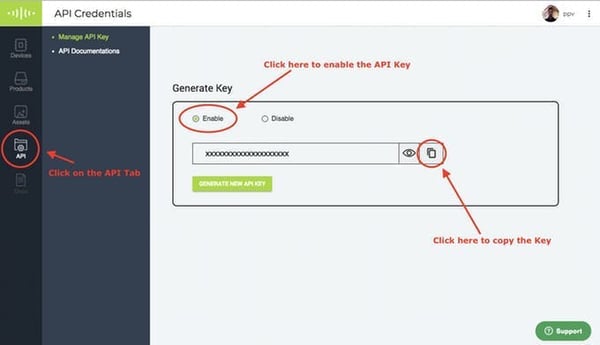
Next click on the copy button to copy your API key. Your API key will may look something like this: f1f918e9-d9c2-4e5b-aed0-b7cb743f74cf
Step 2) Write the GPIO Control Command
Since LED is a digital output device, we will need to get a Digital Write command that can be sent to Bolt over the Internet to switch on the LED.
In Bolt Cloud go to Docs Tab -> API Documentation -> GPIO Commands API -> Write Digital OutputThe command to turn the light on is:
https://cloud.boltiot.com/remote/f1f918e9-d9c2-4e5b-aed0-b7cb743f74cf/digitalWrite?pin=0&state=HIGH&deviceName=BOLT13819450Make sure that you change the API Key to your own API Key and device ID which you got in the previous step.If you have connected the LED to any other pin other then Pin 0 then make a suitable change in the pin no in your code.
Step 3) Integrate IFTTT via Google Assistant and Webhooks
Go to IFTTT to create a new applet by clicking here
Click on '+This'
Choose Google Assistant -> Say Specific Phrase
Type the phrase you want to trigger the action. Make sure to specify the trigger command in different ways for example I used
a) Turn the office lights on
b) Turn on the office lights
c) Turn on the lights in office
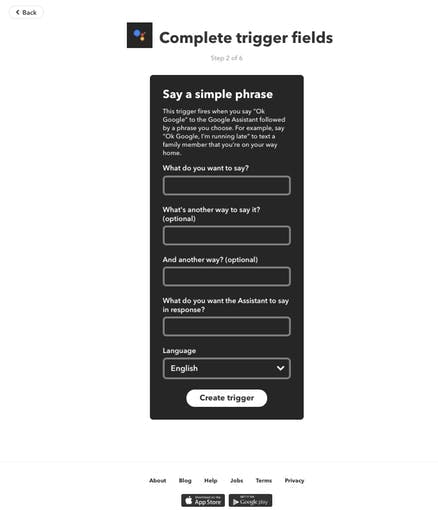
Click on 'Create Trigger'
Click on '+That'
Select Webhooks and then Make a web requestEnter the API URL you got in the previous Step.
Make sure that you change the API Key and device name.
Method will be GET
Content type will be Application/json
Here is how your screen will look like
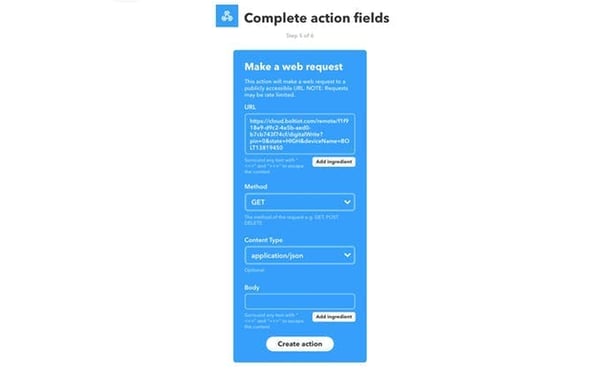
Click on 'Create Action' and then Click on 'Finish'
Now do the same process for a command to switch of the LED. Here you will change the state to LOW i.e. state=LOW in your code. Here is a sample of the code. Also, add a suitable phrase to switch off the LED.
https://cloud.boltiot.com/remote/f1f918e9-d9c2-4e5b-aed0-b7cb743f74cf/digitalWrite?pin=0&state=LOW&deviceName=BOLT13819450Now wake your Android phone by saying "OK Google" and say the words to see the magic happen.
Conclusion
Have a go at this project, and you can control any light in your house by giving a shout out to google.
Want to build more such IoT and ML projects? Want to learn IoT and ML from basics?
Check out the Bolt IoT and ML training. This online video training is excellent for those who want to start with IoT and ML because it teaches you to build projects from the basics. Click on the button below to know more about the training.


