DIY Pet Feeder Using Bolt IoT Platform
You've just reached office and realised something. Oops! You forgot to add food to your pet's food bowl.
Isn't this annoying and traumatic?
Not to worry anymore as using this guide and a few objects lying around your garage, you can ensure that your pet never goes hungry again and you can feed him/her remotely at the click of a button.
How this project works
The main aim is to remotely feed your pet at the click of a button. On receiving the command from you, the housing should then open and close a trap door which would automatically dispense treats to the hungry waiting pet.
Things used in this project
Hardware components -

- Arduino Uno R3
- Servo motor
- Hot glue gun
- Cardboard box
- Pair of scissors
You can get the Bolt WiFi module and other items with the  . The kit is also included as part of the 'Bolt IoT and ML hands-on training'.
Software components -

- Arduino IDE
Hardware connection
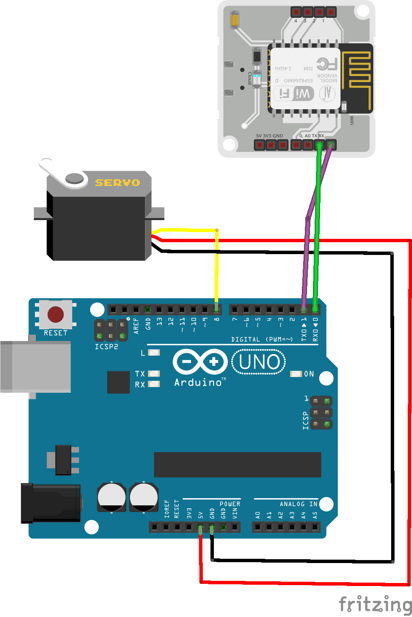
Connect the components as given below in the diagram.
Lets build
Fabricate the housing -
In order to make the housing of your pet feeder, select a few pieces of cardboard that are sturdy enough. You can also choose different materials for your housing if you like.
Next, form two 'L' shapes with the cardboard pieces which are identical. Mark 5cms from the bottom of the short hand of the 'L'. Refer the image below for any clarification. Label the two 'L's as A1 and A2 respectively.
Next cut a rectangular piece of cardboard that is about 7 cm longer than the width of your housing and about 3 cm smaller than the thickness of your housing. Label this part as 'B'.
Make a hole in the spoon which is slightly larger than the nail that you are using as a pivot and insert the nail through it. Make sure that the spoon can rotate freely about the nail like a fidget spinner.
Next heat up the gun glue and glue the nail to the part labeled B. Make a rectangular hole 2cm by 2cm in part B which is roughly 3cm left of the centre.
In part A1, about 8 cm from the bottom, glue a rectangular piece of cardboard which is equal to the length and breadth of A1.
Cut a rectangular hole in cardboard above which is roughly in the center.
In parts A1 and A2, cut a rectangular hole which is roughly 1 cm in height and slightly lesser than the width of parts A1 and A2.
Now glue A1 and A2 together so that they form a rectangular box and the cuts that you have made in the step above line up.
Insert part B through the slits in the now joined parts A1 and A2 and check if it moves freely through the slits.
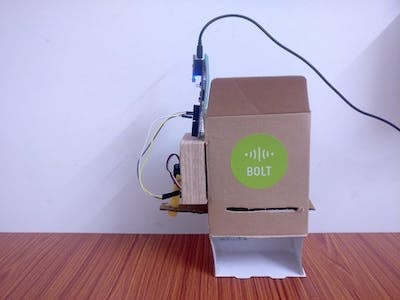
Attach the spoon to the servo motor and your now completed housing should look like the completed product without the Bolduino attached to it.
The completed housing would be enough to store treats for feeding a cat a couple of times in my design. You can increase the storage if your pet's appetite is voracious.
Connect the various components
The servo motor should have three wires coming out of it which may be Black(GND), Red(5V) and White(PWM input) in colour.
Connect the jumper cables from the Servo motor to the Boltduino in the fashion given below:
| Arduino | Servo motor | |
| 5V | <==> | 5V |
| GND | <==> | GND |
| Pin 9 | <==> | PWM input |
Upload codes
Write code for Arduino using the Arduino IDE and upload it. Write the code for the front-end and upload it to the Bolt cloud for a new product.
The codes are given at the end of the project.
Conclusion
Open your cloud dashboard and open the product associated with your Bolt.
Add pet food (not the mushy kind, but rather the dry treats) from the top of the housing and close it with a lid. Setup someplace comfortable where your pet cannot knock it down and attach a feeding bowl under the trapdoor. Click on the Feed me button and watch your creation dispense food to feed your pet.
If you want to strengthen or modify the design of the housing so that your pet does not chew up the housing, by all means please do so.
So, the next time you forget to feed your pet, you can do that using the Bolt Cloud and a push of a button.
Want to build more such IoT and ML projects? Want to learn IoT and ML from basics?
Check out the Bolt IoT and ML training. This online video training is excellent for those who want to start with IoT and ML because it teaches you to build projects from the basics. Click on the button below to know more about the training.

Codes
You can find the codes for this project on this github link