Voice Activated DIY Pet Feeder Using Bolt
Feed your pet using just your voice!
In my previous project, I had shown you how you can MacGyver yourself a pet feeder using minimal components.
Well, as it turns out, I'm too lazy and logging in to the Bolt cloud to feed my pet was a bit too much.
So, I've utilized the Bolt cloud and IFTTT's service to feed my pet whenever I tell Google Assistant on my phone to do so.
The Google Assistant on my phone feeds my pets whenever I say the words - "OK Google, Feed my pet.".
This avoids me having to log in to the Bolt Cloud console to click a button to feed my pet. I can just tell my Android phone to do it for me.
How this works
- I say - "OK Google, feed my pet" to my phone.
- Google Assistant recognizes the command and sends a request to IFTTT.
- IFTTT triggers a webhook linked to my Pet-Feeder.
- Since my Pet-Feeder is connected to the Bolt Cloud, it understands the webhook and sends a command to my device to feed my pet.
Things used in this project
Hardware components -

- Servo motor
- Arduino Uno R3
You can get most of these components with the  . The kit is also included as part of the 'Bolt IoT and ML hands-on training'.
Software components -

- IFTTT
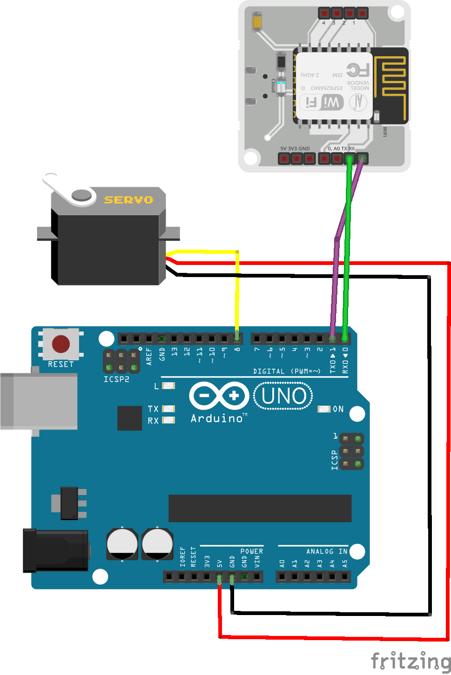
Hardware connections
Connect the components as described in the image below,
What is IFTTT?
IFTTT stands for If This Then That. It is a free service which allows users to create triggers and execute actions based on the triggers.
Head here to log in to IFTTT.
Lets build the project
How to create the URL for triggering your Pet-Feeder
- The URL that you will be using to trigger the pet-feeder will be a Serial Write command that needs to be sent to the Bolt.
- The Arduino will be listening and on a successful command match, it will open and close the door in the pet-feeder, thus feeding your pet.
- The URL will be something like,
https://cloud.boltiot.com/remote/<YOUR_API_KEY>/serialWrite?data=a&deviceName=<YOUR_DEVICE_NAME> - Replace the API key and the device name with your own.
- You can find your API key and the device name by logging in to your Bolt Cloud dashboard.
- Save this URL as you will be needing it later.
.
Steps to link your Android phone to IFTTT
- Sign in to IFTTT using the same Google Email ID as used in your Android phone. If my phone was signed using the Email ID xyz@gmail.com, then sign in to IFTTT using the same Email ID.
- Click on "New Applet" from the top right hand side dropdown menu.
- IFTTT now shows you something like this,

- Click on +this. Now this would show you a list of services to base your trigger on. Go ahead and select the Google Assistant service.
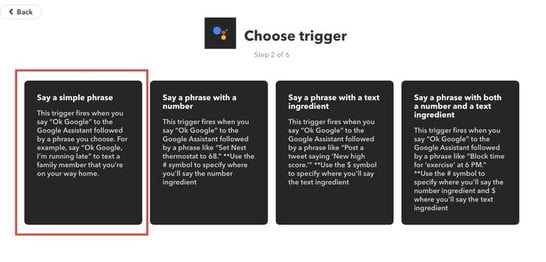
- Now, you are faced with some options. Since we want to speak to Google Assistant to trigger something, choose the option which says - "Say a simple phrase".
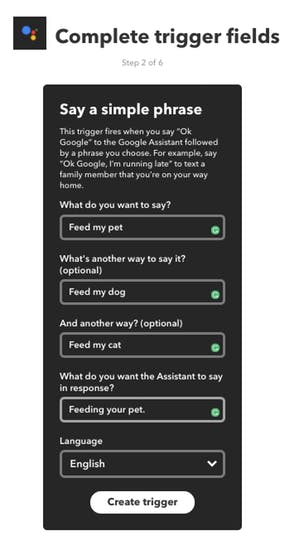
- Next you can type the trigger for Google Assistant. Google Assistant would recognize this trigger and send a message to the Bolt Cloud. For my purpose, I have set the trigger as "Feed my pet." in response to which Google Assistant would say "Feeding your pet.".
- After creating the trigger, you need to tell IFTTT what to do when the trigger is activated.
- Click on +that on the screen. This will let you choose a service to execute something when the trigger is activated.
- Search and click on "Webhook" service and choose the option to "Make a Web Request".
- So, IFTTT would send a webhook whenever your trigger is activated.
- In the next screen, enter the URL as the API call for your Bolt device. Method should be GET and content type is "Application/json".
- The URL will be the same URL that I have explained the above section.
- When completed, it should look something like the picture below.
In Action
- Say "Okay Google. Feed my pet." on your Android phone.
- The Google assistant should recognize the command and respond with "Feeding your pet."
- The Pet-Feeder should open and close the trap-door which dispenses food for your pet.
Want to build more such IoT and ML projects? Want to learn IoT and ML from basics?
Check out the Bolt IoT and ML training. This online video training is excellent for those who want to start with IoT and ML because it teaches you to build projects from the basics. Click on the button below to know more about the training.