You've just reached office and realised something. Oops! You forgot to add food to your pet's food bowl.
Isn't this annoying and traumatic?
Not to worry anymore as using this guide and a few objects lying around your garage, you can ensure that your pet never goes hungry again and you can feed him/her remotely at the click of a button.

The main aim is to remotely feed your pet at the click of a button. On receiving the command from you, the housing should then open and close a trap door which would automatically dispense treats to the hungry waiting pet.
Things used in this project
Hardware components

- Servo motor
- Cardboard pieces. (Preferably large up or up to your liking)
- Pair of scissors.
- Sturdy plastic spoon.
- 1 inch nail.
- Hot Gun Glue.
Software, Apps and online services

Hardware setup
Step 1) Fabricate the Housing
In order to make the housing of your pet feeder, select a few pieces of cardboard that are sturdy enough. You can also choose different materials for your housing if you like.
Next, form two 'L' shapes with the cardboard pieces which are identical. Mark 5cms from the bottom of the short hand of the 'L'. Refer the image below for any clarification. Label the two 'L's as A1 and A2 respectively.
Next cut a rectangular piece of cardboard that is about 7 cm longer than the width of your housing and about 3 cm smaller than the thickness of your housing. Label this part as 'B'.
Make a hole in the spoon which is slightly larger than the nail that you are using as a pivot and insert the nail through it. Make sure that the spoon can rotate freely about the nail like a fidget spinner.
Next heat up the gun glue and glue the nail to the part labeled B. Make a rectangular hole 2cm by 2cm in part B which is roughly 3cm left of the centre.
In part A1, about 8 cm from the bottom, glue a rectangular piece of cardboard which is equal to the length and breadth of A1.
Cut a rectangular hole in cardboard above which is roughly in the center.
In parts A1 and A2, cut a rectangular hole which is roughly 1 cm in height and slightly lesser than the width of parts A1 and A2.
Now glue A1 and A2 together so that they form a rectangular box and the cuts that you have made in the step above line up.
Insert part B through the slits in the now joined parts A1 and A2 and check if it moves freely through the slits.
Attach the spoon to the servo motor and you have now completed the housing. The housing should look like the completed product without the Bolt device attached to it.
The completed housing would be enough to store treats for feeding a cat a couple of times in my design. You can increase the storage if your pet's appetite is voracious.
Step 2) Connect the various components
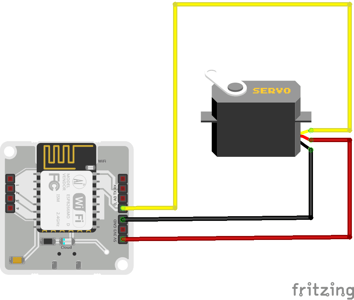
The servo motor should have three wires coming out of it which may be Black(GND), Red(5V) and White(PWM input) in colour.
Connect the jumper cables from the Servo motor to the Bolt device in the fashion given below:
- Bolt device<-- --> Servo motor
- 5V <-- -- Red Wire
- GND <-- -- Black Wire
- Digital Pin 0 -- --> White Wire
For further clarity, refer to the Fritzing diagram.
Software Programming
Step 1) Write codes
Create a new product on the Bolt Cloud as GPIO OUTPUT.
Click on the configure button, and add the following code to the code section of the product.
function open_door(){
    servoWrite(0,60);
}
function close_door(){
    servoWrite(0,0);
}
function dispense_treat(){
    console.log("Dispensing Treat");
    open_door();
    setTimeout(close_door,2000);
    console.log("Dispensed Treat");
}
singleButton({ name : "Feed Pet", action :"dispense_treat"});
Do remember to name the code, and select the code type as JS.
Save the product, and link your device to the product.
NOTE: If the individual steps mentioned above are not understandable, click here , to find out detailed explanations on how to carry out the steps.
Code Explanation:
The above code has 3 functions which do the following:
- open_door : The function makes a call to the servoWrite API, via the boltCommands.js library. The passed parameters tell the Bolt WiFi module, to set the servo motor connected to the pin 0 to an angle of 60 degrees. This angle opens the pet feeder, to dispense the treats.
- close_door : The function makes a call to the servoWrite API, via the boltCommands.js library. The passed parameters tell the Bolt WiFi module, to set the servo motor connected to the pin 0 to an angle of 0 degrees. This angle closes the pet feeder, stopping the treats from falling.
- dispense_treat: This function calls the open_door and close_door functions in succession, with a time difference of 2 seconds (2000 milli seconds). This causes the pet feeder to open and then close after 2 seconds.
The code ten uses the quick buttons facility of the Bolt Cloud (documented here) to add a button to your device view, and link the button the to dispense_treat function. So when you click on the button, the pet_feeder dispenses the treat.
Step 5: Deploy the project
Open your cloud dashboard and open the product associated with your Bolt.
Add pet food (not the mushy kind, but rather the dry treats) from the top of the housing and close it with a lid. Setup someplace comfortable where your pet cannot knock it down and attach a feeding bowl under the trapdoor. Click on the Open Feeder Door button, and watch your creation dispense food to your pet. Do remember to hit the Close Feeder Door button when you are done, or risk having to take your pet to the gym.
If you want to strengthen or modify the design of the housing so that your pet does not chew up the housing, by all means please do so.
Things to Note
These are the things you have to remember while having to control a servo motor with the Bolt WiFi module.
- This feature is only available for Bolt Cloud Pro users. Click here to upgrade to Bolt Cloud Pro.
- The feature only works with for Bolt WiFi module which have a firmware version 1.4.1 and above. Click here to find out how to update your device firmware.
- Servo motors generally require a bit of a kick when it comes to power supplies, so if your motor is not moving the way you want it, try using a power supply with a higher current rating. (Voltage rating should be 5v).
Conclusion
With this project done, you can sit back, relax and just click a button when the pets are annoying you for food. They will immediately scurry off to the pet feeder.
Want to build more such IoT and ML projects? Want to learn IoT and ML from basics?
Check out the Bolt IoT and ML training. This online video training is excellent for those who want to start with IoT and ML because it teaches you to build projects from the basics. Click on the button below to know more about the training.