

Planning for a big event in the near future?
Want to keep track of how many people come to your event, so you can brag about how good your event was?
Don't have the man power to keep track?
If the answer to the all the the questions above, is yes the Bolt Cloud PRO is here to rescue you.
Things used in this project

Hardware components

- Proximity sensor.
- Connecting berge pin cables.
- micro USB cable.
- Standard USB wall charger.
- A computer with Internet access
Software, Apps and online services

If you have all of the above, let's get started.
Hardware Setup
Spoilers: We have done quite a few of these steps in earlier blogs, so I will be adding links to the Cloud documentation for most of them. This is for the benefit of the people who are not familiar with the Bolt Cloud.

Step 1) Refer to the following diagram for the circuit connection.
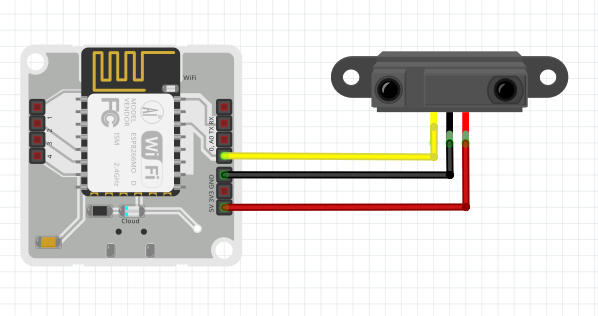
- Connect the output pin of the sensor to pin 0 of the Bolt WiFi module.
- Connect the GND pin of the sensor to GND pin of the Bolt WiFi module.
- Connect the VCC pin of the sensor to the 5V pin of the Bolt WiFi module.
Use the wall charger and micro USB cable to power up the Bolt WiFi module, and your circuit connections are ready.
Step 2) To get a good reading place the sensor right outside the entry door, in a manner where it will be able to detect a person moving through the door. You can test out whether the sensor detects a person entering the venue by going through the door yourself, and checking if the sensor lights up.Step 3) Next you have to setup the Bolt WiFi module to connect to the Cloud. You can look up the steps by clicking here.
Step 4) Create a new product on the Bolt Cloud as a GPIO input type of product. You can look up the steps by clicking here.
Step 5) Configure the new products hardware section to monitor the GPIO 0 pin of the Bolt WiFi module. Remember to select 'TRIGGER' as the data collection rate. You can look up the steps for configuring the hardware, by clicking here.
Step 6) Link your device to the newly created product, and hit the deploy configurations button. You can look up the steps by clicking here.
And you are done with the hardware configurations!!!
Software Setup
Step 1) To get SMS notifications regarding the footfall, you will need to setup your twilio account. You can look up the steps by clicking here.
You will need to get details such as 'SID', 'AUTH_TOKEN', 'FROM_NUMBER' from your twilio console. These details will be required in the code.
Step 2)For this step, you will need a linux computer with an internet connection, and the capability to run python codes. You could also setup a Digital Ocean droplet to run your python code. A quick Google search will give you lots of resources on how to setup such a system.
Via a terminal run the following commands
sudo apt-get install cron
sudo apt-get install python3.6
pip install boltiot
With this you have all the software you require to run your code.
Step 3) Write the code

On your computer system, create a new file named 'footfall.py' and put the following code inside of it.
from boltiot import Sms
import requests
import json, datetime

SID = 'You can find SID in your Twilio Dashboard'
AUTH_TOKEN = 'You can find on your Twilio Dashboard'
FROM_NUMBER = 'This is the no. generated by Twilio. You can find this on your Twilio Dashboard'
TO_NUMBER = 'This is your number. Make sure you are adding +91 in beginning'
API_KEY = 'This is your Bolt Cloud accout API key'
DEVICE_ID = 'This is the ID of your Bolt device'

sms = Sms(SID, AUTH_TOKEN, TO_NUMBER, FROM_NUMBER)

print("Pulling data from the Bolt Cloud.")
response=requests.get("https://cloud.boltiot.com/remote/%s/fetchData?deviceName=%s" % (API_KEY, DEVICE_ID))
response_data = json.loads(response.text)
data = response_data["data"]
count = 0
today = str(datetime.date.today())

print("Going through the data.")
for count_entry in data:
    if not str(count_entry[0]).startswith(today):
        continue
    if count_entry[1] != "1":
        continue
    count = count + 1

print("Today's footfall is %s." % str(count))
print("Sending update via SMS.")
sms.send_sms("The footfall for today is %s." % str(count))
print("All done.")
Replace the entries in the code for 'SID', 'AUTH_TOKEN', 'FROM_NUMBER' and 'TO_NUMBER' from the details that you get on your Twilio console.
Replace the entries such as the API_KEY and DEVICE_ID, from the Bolt Cloud dashboard.
Step 4) Test the code
Use the following command to test run the code
python footfall.py{ crontab -l; echo "55 23 * * * /usr/bin/python $(pwd)/footfall.py"; } | crontab -And that's all folks!!
Conclusion
You will get a message every night at 11:55 pm, telling you exactly how many people entered your event!

Want to build more such IoT and ML projects? Want to learn IoT and ML from basics?
Check out the Bolt IoT and ML training. This online video training is excellent for those who want to start with IoT and ML because it teaches you to build projects from the basics. Click on the button below to know more about the training.