

Imagine you wanted to keep track of the cricket score, or the current price of a stock you have your eye on, or maybe even how many likes you have on a specific post on facebook, all while having to work on the very important report. Checking up on any of these would mean you would have to go through the steps of unlocking your phone, going to the specific app and searching for the specific information, and then viewing it. Now imagine you could track any one of these things with just a single glance.
With the help of Bolt IoT platform you can get this kind of display up and running in just a few minutes.
Things used in this project
Hardware components

- Arduino UNO & Genuino UNO
- I2C/SPI character lcd
Software apps and online services
- Arduino IDE

Hardware setup
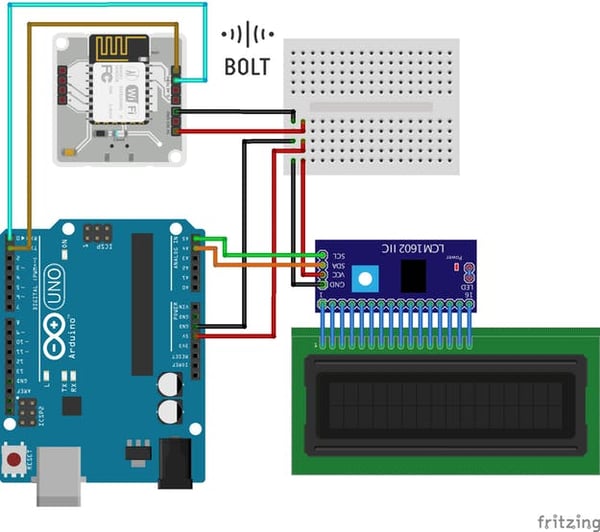
This project builds on Interfacing with controller section of the BoltIoT docs, and the connections may seem overwhelming at first, but when you get into it, the connections get done pretty quickly.
The use of an I2C enabled LCD display reduces the effort required to connect the LCD to half. It has only 4 connections (Compared to a regular 16*2 lcd which has 16).
Step 1) Connect the LCD to the Arduino as follows
- SCL of the lcd goes to A4 of Arduino.
- SDA of the lcd goes to A5 of Arduino.
- VCC of the lcd goes to 5v of the Arduino.
- GND of the lcd goes to Gnd of the Arduino.
Step 2) Connect the Bolt WiFi unit to the Arduino as follows
- Tx of Bolt to Rx of Arduino.
- Rx of Bolt to Tx of Arduino.
- Gnd of Bolt to Gnd of Arduino.
- Vcc of Bolt to Vcc of Arduino.
Please refer to the following Fritzing diagram to simplify your connections.
The LCD along with the Bolt unit draws quite a bit of current from the system. Use of DC adapter is recommended.
Software setup
Step 1) If you have not already done so create a Bolt Cloud account here.Step 2) Download the Bolt app (for Android and Iphone), and follow the steps in the app to connect your Bolt WiFi module to your WiFi. (Skip if already done)
Step 3) Download the Arduino code from here. Flash it into the Arduino Uno(Do remember to disconnect the Bolt unit while doing so. The serial programming sometimes gets messed up due to it's presence.)
Step 4) Login to cloud.boltiot.com and note the ID of your
.Now click on the API Tab and under the section for Generate Key, click on Enable.
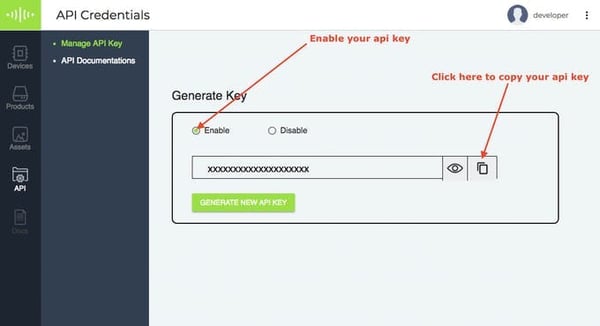
Next click on the copy button to copy your API key. Your API key will may look something like this: f1f918e9-d9c2-4e5b-aed0-b7cb743f74cf
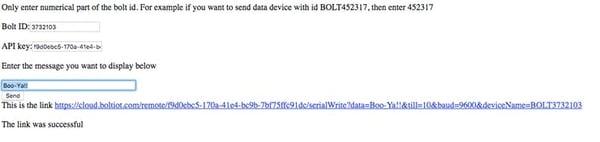
Step 5) Save the code from the end of this blog as lcd_control.html, and
<!DOCTYPE html>
<html>
    <head>
        <title>Lcd Display Interface</title>
        <meta charset="UTF-8">
        <meta name="viewport" content="width=device-width, initial-scale=1.0">
        <script src="https://ajax.googleapis.com/ajax/libs/jquery/3.2.0/jquery.min.js"></script>
    </head>
    <body>
        <div >Only enter numerical part of the bolt id. For example if you want to send data device with id BOLT452317, then enter 452317</div><br>
        <div>Bolt ID:<input type="Text" id="boltid" placeholder="xxxx"></div><br>
        <div>API key:<input type="Text" id="apikey" placeholder="xxxxxxxx-xxxx-xxxx-xxxx-xxxxxxxxxxxx"></div><br>
        <div >Enter the message you want to display below</div><br>
        <input id="command" type="text" size="40"><br>
        <button onclick="SendCommand()">Send</button><br>
        <div id="display"></div><br>
        <div id="commandstatus"></div><br>
        <div id="commandvalue"></div><br>
        <script>
            link="";
            function SendCommand(){
                var apikey=document.getElementById('apikey').value;
                var devicename=document.getElementById("boltid").value;
                var command=document.getElementById('command').value;
                link="https://cloud.boltiot.com/remote/"+apikey+"/serialWrite?data="+command+"&till=10&baud=9600&deviceName=BOLT"+devicename;
                if(apikey==""){
                    document.getElementById('commandstatus').innerHTML="Please enter an api key"
                    return;
                }
                if(devicename==""){
                    document.getElementById('commandstatus').innerHTML="Please enter a device name"
                    return;
                }
                if(command==""){
                    document.getElementById('commandstatus').innerHTML="Please enter some data"
                    return;
                }
                $.get(link,function(success,value){
                    if(value=="success"){
                        if(success['success']==1){
                            document.getElementById('commandstatus').innerHTML="The link was successful";
                            document.getElementById('display').innerHTML="This is the link <a href=\""+link+"\">"+link+"</a>";
                        }else{
                            document.getElementById('commandstatus').innerHTML=success['value'];
                        }
                    }else{
                        document.getElementById('commandstatus').innerHTML="Please check the api key entered"
                    }
                });
            }
        </script>
    </body>
 </html>
Step 6) Open the html file in a browser. Once you enter the required data into the form, the form will run the command and also show you what the command looks like so that you can use it in your custom monitoring code.
Things to Note
There is a possibility that the display ends up showing your message with some extra characters. This bug was detected in the Bolt Wifi module Firmware version 1.0.4 and fixed in the Bolt Wifi firmware version 1.0.5. If you see this bug, use the instructions given here to update the firmware of your device to the latest version.Conclusion
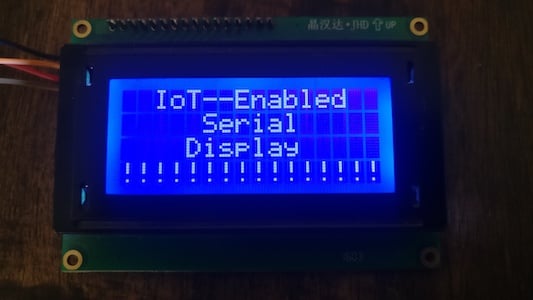
With all the steps done, you now have a your display that you can use to show messages from anywhere in the world. Just open the web page, enter the message, and hit the send button. It is that simple.
Want to build more such IoT and ML projects? Want to learn IoT and ML from basics?
Check out the Bolt IoT and ML training. This online video training is excellent for those who want to start with IoT and ML because it teaches you to build projects from the basics. Click on the button below to know more about the training.