
Ever wanted to scare those pesky kids on Halloween as they are picking up sweets from your porch? Look NO further...
It's nearly Halloween! Time to bring out those spooky skeletons and cobwebs to make your house the most haunting on the street.
Kids coming to your house to get candy? Time to scare them for one last time before they get the sweet treats.
This project helps you build a bowl which will scare those pesky kids one last time by sounding a loud alarm as they reach inside the bowl to grab some candies.
As soon as an obstruction is detected by the Ultrasonic distance sensor mounted on the bowl, a buzzer will sound. The system can be turned on/off via the Bolt Cloud.

And lastly some candies to put in your bowl as bait.
You can get the Bolt WiFi module and other items with the Bolt IoT & ML Starter Kit. The kit is also included as part of the 'Bolt IoT and ML hands-on training'.
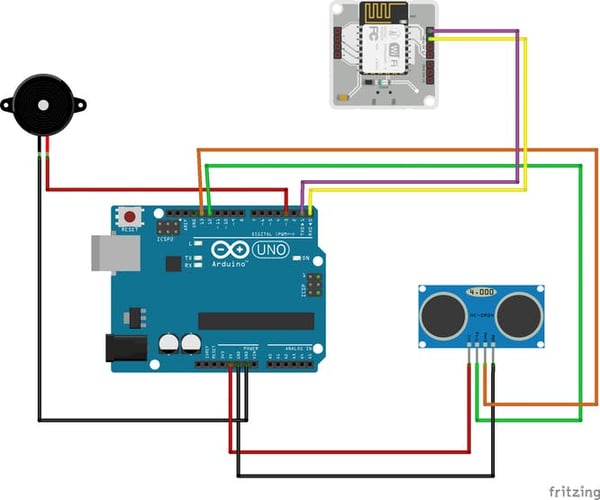
Connect the hardware components as given in the diagram below,
The end project will look something similar to the one below.
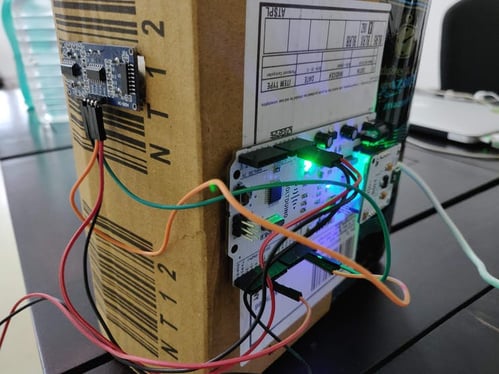
I have used an empty cardboard box for this project, but you can choose an even bigger one for your purpose. Just make sure that the Ultrasonic sensor is positioned so that it covers the entrance of the box where the hand is expected to come to pick up the candy.
View your product on the Bolt Cloud and click on the "Arm System" button to arm the system. In this mode, the system will make noise whenever someone tries to put their hand inside the bowl.
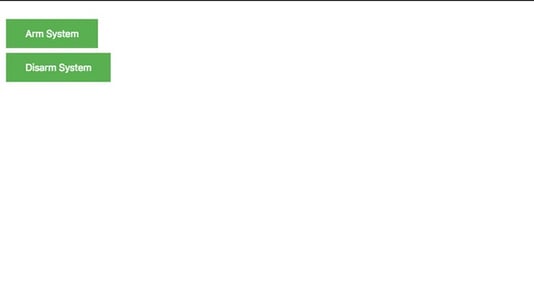
You can also switch off the system by clicking on the "Disarm System" button to disable the noise.
Keep your bowl on your doorstep, make sure that the system is armed and watch the fun.
You can connect an even powerful hooter/buzzer to really scare people when they put their hand inside.
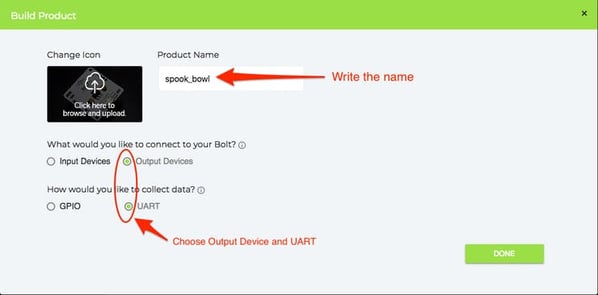
Bolt Cloud product code
Upload the code below as the product code on the Bolt Cloud.
<!DOCTYPE html>
<html>
<head>
    <title>Spooky Bowl</title>
    <script src="https://ajax.googleapis.com/ajax/libs/jquery/3.3.1/jquery.min.js"></script>

    <style>
        .button {
            background-color: #4CAF50;
            border: none;
            color: white;
            padding: 15px 32px;
            text-align: center;
            text-decoration: none;
            display: inline-block;
            font-size: 16px;
            margin: 4px 2px;
            cursor: pointer;
        }
    </style>

</head>
<body>
    <button class="button" onclick="arm_system()">Arm System</button>
    <br>
    <button class="button" onclick="disarm_system()">Disarm System</button>

<script type="text/javascript">
    var BOLT_ID = "";  //Change this value
    var API_KEY = "";   //Change this value
    var ARM_COMMAND = "arm_system";
    var DISARM_COMMAND = "disarm_system";

    function arm_system(){
        start_communication();
        make_request(ARM_COMMAND);
    }

    function disarm_system(){
        start_communication();
        make_request(DISARM_COMMAND);
    }

    function make_request(command){
        $.ajax({
            type: "GET",
            url: "https://cloud.boltiot.com/remote/" + API_KEY + "/serialWR",
            cache: false,
            async: false,
            data: {
                "data": command,
                "deviceName": BOLT_ID
            },
            success: function(response){
                console.log(response)
                var status = response["success"];
                if(status!=1){
                    alert("Device is offline!");
                }
                else{
                    alert(response["value"]);
                }
            },
            error: function(response){
                alert(response);
            },
        });
    }

    function start_communication(){
        cmd_serial_begin();
    }

    function cmd_serial_begin(){
        $.get("https://cloud.boltiot.com/remote/" + API_KEY + "/serialBegin?baud=9600&deviceName=" + BOLT_ID);
    }
</script>

</body>
</html>
Upload the code below to Arduino via the Arduino IDE
#include <BoltIoT-Arduino-Helper.h>
#include <Ultrasonic.h>

Ultrasonic ultrasonic(12, 13);
int distance;
int min_distance = 15;    //Change this value to the width of your bowl
int BUZZER_PIN = 3;
bool system_armed = true;

void setup() {
  pinMode(BUZZER_PIN, OUTPUT);
  digitalWrite(BUZZER_PIN, LOW);
  boltiot.begin(Serial);
  boltiot.setCommandString("disarm_system",disarm_system);
  boltiot.setCommandString("arm_system",arm_system);
  Serial.begin(9600);
}

String arm_system(){
  system_armed = true;
  return "System Armed";
}

String disarm_system(){
  system_armed = false;
  return "System Disarmed";
}

void sound_buzzer(){
  digitalWrite(BUZZER_PIN, HIGH);
  delay(1000);
  digitalWrite(BUZZER_PIN, LOW);
}

void loop() {
  boltiot.handleCommand();
  distance = ultrasonic.read();
  if(system_armed){
    if(distance < min_distance){
      sound_buzzer();
    }
  }
  delay(100);
}
Check out the Bolt IoT and ML training. This online video training is excellent for those who want to start with IoT and ML because it teaches you to build projects from the basics. Click on the button below to know more about the training.

Get the latest IoT tutorials, projects, and updates delivered to your inbox.